|
|
| The Preparation of Trophi of Rotifers |
|
Trophi examination and preparation for rotifers is a multi-step process. It can basically be divided into three phases:
1. Isolation of the animal.
2. Maceration with sodium dodecyl sulfate (SDS).
3. Maceration with sodium hypochlorite (NaOCl).
Here are a few explanations:
1. The first step is to isolate the animal using a stereo microscope. My isolation process works very well for rotifers. I select interesting animals from a water sample in a small Petri dish (5 cm diameter) at 25x magnification. Over time, you learn to distinguish most genera even at this low magnification. Then, using an Eppendorf pipette, an animal (or even single-celled organisms) is aspirated into 25 µl and placed on a previously well-cleaned microscope slide. A microfiber cloth is very suitable for cleaning because it does not leave any fibers on the slide. Due to the tiny size of the rotifer, it is important that only the rotifer is visible under the cover glass (CG) and no other particles such as algae, remains of small crustaceans, or detritus. For this reason, as little liquid as possible is transferred from the sample at this point, hence the 25 µl. If there are still detritus residues or similar particles in the water drop, add a drop of clean water (I use Volvic) and again use the Eppendorf pipette to suck out the unwanted particles. This step can be repeated as often as necessary. In the end, there should be a rotifer in a drop of approximately 50 µl.
Until recently, I used the following procedure: then place the cover glass on top. Unfortunately, according to Murphy's Law, the rotifer rarely ends up in the middle of the cover glass, but rather at the edge. This means that oil immersion cannot be used later. In most cases, the animal swimms/ creeps back and forth under the cover glass anyway, so you have to carefully secure the animal by sucking up the water with filter paper. This is followed by observation and documentation under the microscope. If the animal appears to be in a suitable position so that the trophi are reasonably clear, you can suck up more water.
Since I have also been interested in the movement of rotifers for several years, I now proceed as follows in many cases: before placing the CG, I apply a thin layer of Vaseline to two edges. To do this, rub a thin layer of Vaseline onto the palm of one hand, then wipe this layer off with the CG so that a rim approximately 1 mm thick is created on one of the four edges. This is done on two opposite sides of the CG. The CG is then placed over the water drop previously created on the slide. Either the water drop comes into contact with the CG after it has been placed on the slide. In this case, a more or less large circular area under the CG should be filled with water. Otherwise, you can now carefully press down on the four corners with tweezers using the Vaseline until the CG comes into contact with the water drop. This method has the advantage that there is now a limited volume under the CG in which the rotifer can move freely, so that its movements can be documented and observed. |
 |
| |
Due to the plasticity of the Vaseline, it is now possible to further reduce the thickness of the water layer in a very controlled manner. It is thus possible to continuously control the wheel animal's range of motion: |
 |
| |
2. Next, a drop of detergent is added to the opposite side, approximately 5 mm from the CG. I use sodium dodecyl sulfate (SDS), but regular dish soap will do.Initially, the drop should not come into contact with the CG or the water underneath. Then, using the tip of an Eppendorf pipette, the drop is drawn toward the CG so that it touches the water layer adjacent to it.Why so complicated? The biggest problem during preparation is that the newly fixed animal (or parts of it) will swim away if liquid is added to the edge of the CG. Therefore, it is extremely important to be able to monitor the maceration process as closely as possible. Thus, the amount of liquid used should be as small as possible, but the concentration should be high enough to produce a noticeable effect. This is a matter of experience; I cannot provide any specific values. Typically, when SDS is added, the rotifer simply becomes liquid, meaning that without a hectic death struggle, its movements simply cease and the internal organs flow out of the animal. The integument, i.e., the animal's skin, is initially unaffected by the SDS, so any fine structures present are preserved and can be easily observed. This allows for the visualization of structures that have not yet been described in the literature.
Here are a few examples: Bryceella perpusilla: epipharyngeal structures on the head: |
 |
| |
| Openings of the lateral antennae: |
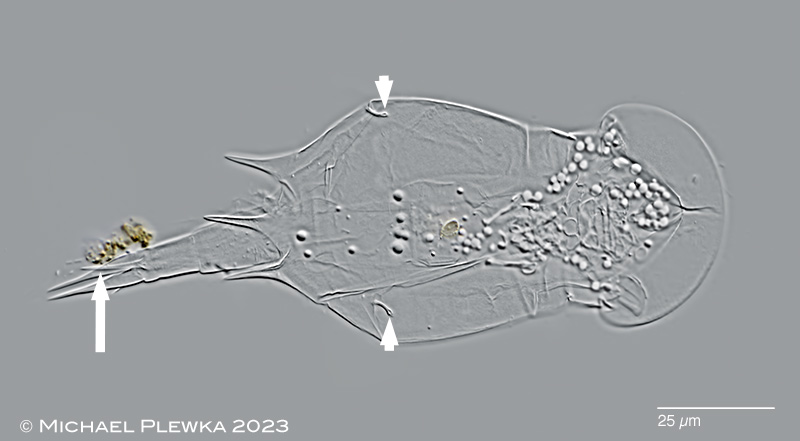 |
| Squatinella rostrum (with appendage between the toes (arrow)): openings of the lateral antennae (arrowheads): |
| |
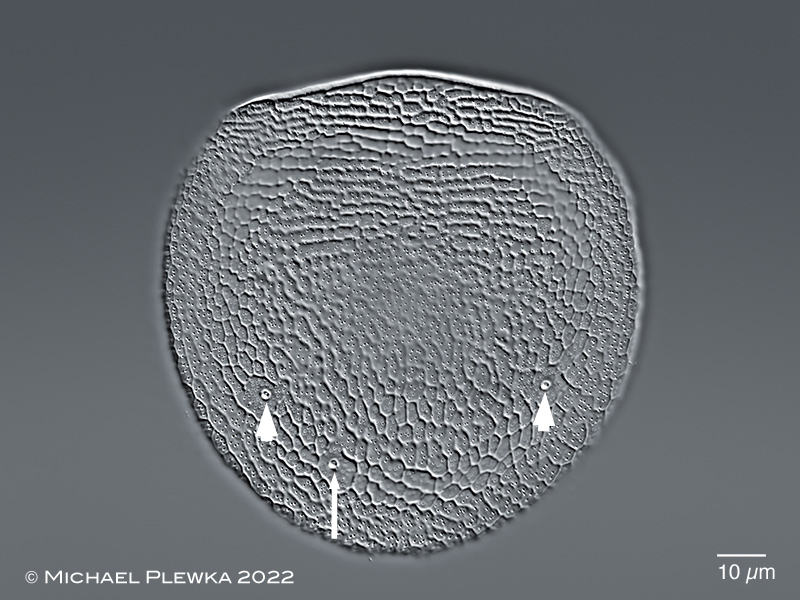 |
| Ascomorpha ovalis: openings of the lateral antennae (arrowheads): |
| |
 |
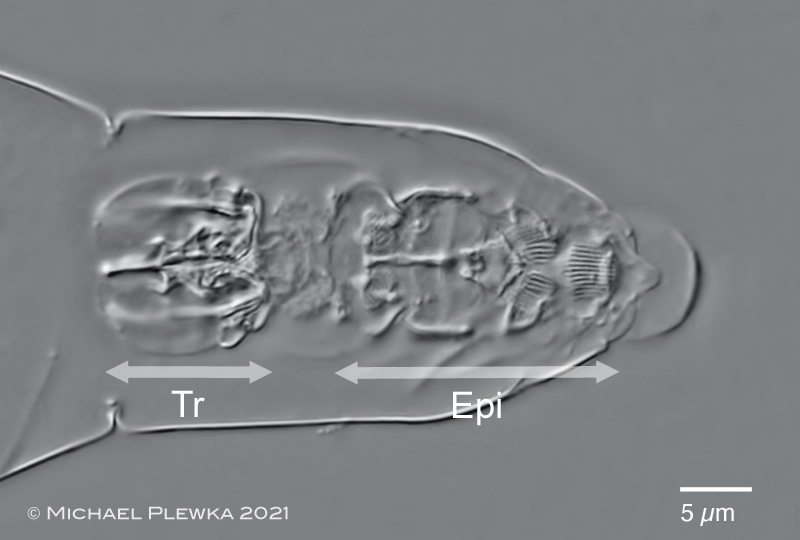
| Adineta vaga: anterior part with chitinous structures of the digestive system: RA: rake apparatus (with 5 U-hooks in each rake); BT: buccal tube; Tr: trophi. |
| |
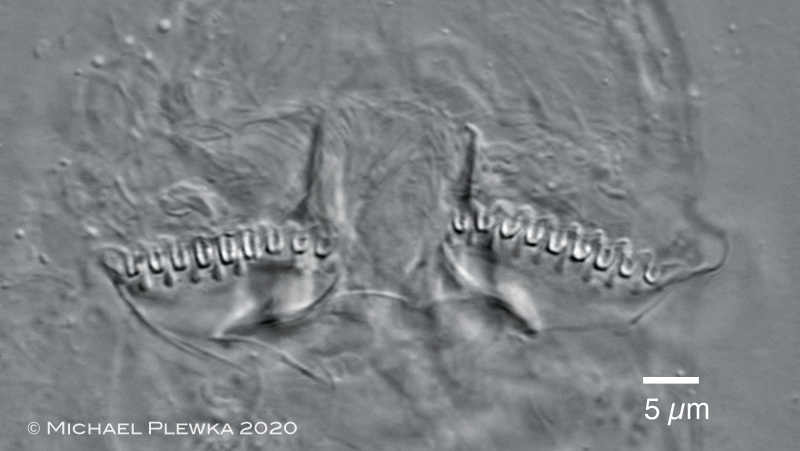 |
| Adineta steineri: rake apparatus (with 9 U-hooks in each rake. |
| |
If you're lucky, the trophi will also be flushed out during this procedure or pressed out by the increasing occlusion and may already be in a good position.
3. Depending on the rotifer species, however, some tissue remains, which must then be macerated with sodium hypochlorite (NaOCl). Here, the previously described dangers are even more likely to occur: the tiny trophi may already be exposed, meaning that if liquid is added (i.e., the hypochlorite solution), there's a very high probability that the trophi will be washed away forever. Therefore, the previously described steps must be followed as precisely as possible.
I assume that those reading this are aware of the dangers of this substance (toxic, corrosive, the smallest splashes ruin clothing through bleaching!).
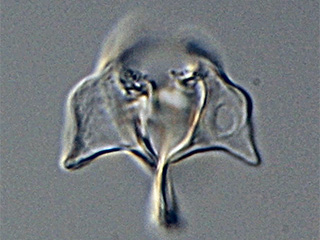
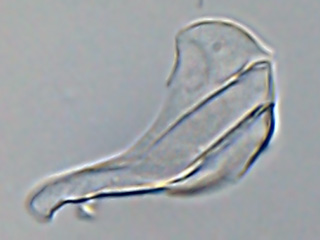
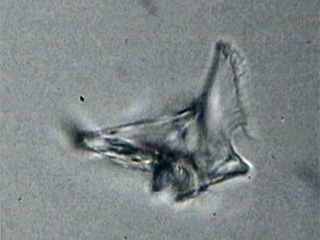
The trophi are then examined and documented using oil immersion. Due to the three-dimensional nature of the individual parts of a trophi, it's highly likely that individual parts will lie on top of each other, so they often cannot be accurately documented. Sometimes you have the opportunity to change the position of the trophi or its parts again by moving the CG, or to separate the chewer parts so that they can then be photographed individually. By appropriate image processing, individual parts can then be reassembled into an overall image: Here is an example: |
|
| Euchlanis incisa: 4 aspects of the malleate trophi: upper left: incus; upper right: manubrium; lower left: unci; lower right: fulcrum (lateral view). |
| |
| |
| |
|
|
|
| |
|
|
|
|